

I want you to help me write a blog post. The goal is to rank this blog post on the first page of google search results for the keyword [How to Screen Record on Mac ]. The keyword [How to Screen Record on Mac ] is going to be the “focus keyword”. First I want to create the outline of this blog post. Give me 3-4 categories . make sure everything you write is in really easy and plain english and also, make sure it looks human written. so really bring the reader along with the story, so say things like: “lets get right in to it” etc.
Write me a short introduction to this Blog post to engage viewers and encourage to click on the links to explore the product for themselves.
Curious about knowing how to screen record on iPhone? CLICK HERE to see our post on How to Screen Record on iPhone in 2024 – BEST TUTORIAL
Table of Contents
How to Screen Record on Mac
Why Screen Recording Matters
Alright, let’s talk about why knowing how to screen record on mac is something you should know how to do.
Show and Tell
Ever tried explaining to someone how to do something on the computer over the phone? It can be a real headache, right? Well, with screen recording, you can show them exactly what you’re doing on your screen. Whether it’s troubleshooting a problem, demonstrating how to use a new app, or guiding someone through a process, screen recording makes it a breeze.
Record Gameplay
Are you a gamer? Well, knowing how to screen record on mac is your best friend. You can capture all your epic gaming moments and share them with your friends or even create your own gaming tutorials. It’s like having your own personal highlight reel.

Create Tutorials and Presentations
If you’re someone who loves teaching or giving presentations, knowing how to screen record on macis a game-changer. You can create step-by-step tutorials, walkthroughs, or slideshows with audio commentary. It’s perfect for educators, trainers, or anyone who wants to share knowledge in an engaging way.
Save Important Moments
Sometimes, you come across something important on your screen that you want to remember or share later. Maybe it’s a hilarious meme, an inspirational quote, or a critical error message that keeps popping up. With screen recording, you can capture these moments and revisit them whenever you want.
Share Experiences
Whether it’s capturing memorable Skype calls with loved ones, recording online meetings for future reference, or documenting your digital art creation process, screen recording allows you to share your experiences with others in a dynamic and visual way.
In essence, how to screen record on mac opens up a world of possibilities. It’s not just about capturing what’s on your screen; it’s about communicating, teaching, sharing, and preserving moments that matter to you. So go ahead, embrace the power of screen recording, and let your creativity soar.
How to Screen Record on Mac
Recording Your Screen
Alright, let’s get right into how to screen record on mac. This is where the magic happens!
Using QuickTime Player
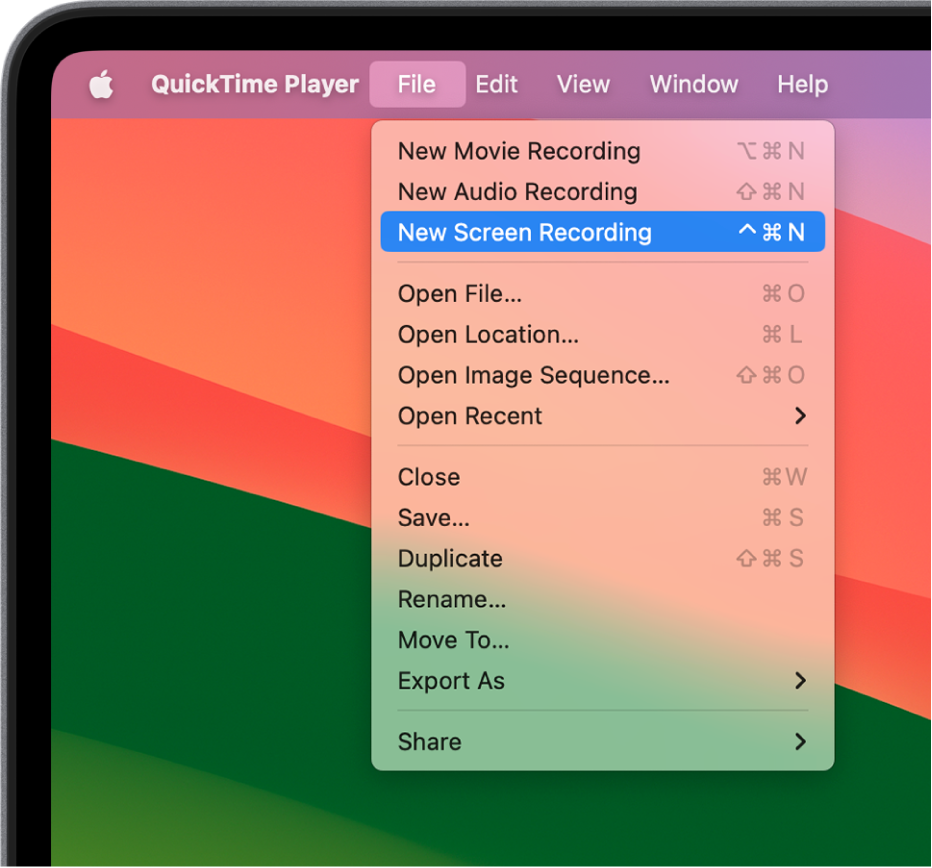
To begin, you can use QuickTime Player, which is already installed on your Mac. Here’s how:
- Open QuickTime Player from your Applications folder.
- Click on “File” in the menu bar at the top of your screen.
- Select “New Screen Recording” from the dropdown menu.
- A recording window will appear, and you can click the big red “Record” button to start recording.
Using Keyboard Shortcut
But hey, if you’re a fan of keyboard shortcuts and like to keep things snappy, there’s another way to start a screen recording on your Mac. Here’s how:
- Simply press Command + Shift + 5 on your keyboard.
- A small control panel will appear at the bottom of your screen, giving you options for screen recording.
- You can choose to record the entire screen or just a selected portion.
- Once you’ve made your selection, click the “Record” button in the control panel to start recording.

Adjusting Settings
Regardless of which method you choose, you can adjust settings like microphone input and video quality before you start recording. Just make sure everything is set up the way you want it before you hit that record button.
Stopping the Recording
When you’re done recording, simply click the stop button in the menu bar at the top of your screen or press Command + Control + Esc on your keyboard. Your recording will be saved on your Mac and ready to watch or share whenever you want.
And that’s all there is to it! Knowing how to screen record on mac is as easy as pie, whether you prefer using QuickTime Player or keyboard shortcuts. So go ahead, give it a try, and start capturing those screen moments.
How to Screen Record on Mac
Enhancing Your Recording
Alright, let’s make your knowing how to screen record on mac even better with some cool enhancements. It’s like adding sprinkles to your ice cream – it just makes everything more fun!
Preparing Your Screen
Before you start recording, it’s a good idea to tidy up your screen a bit. Close any unnecessary windows or applications so you can focus on what you want to capture. This way, your recording will look clean and professional.
Adding Annotations and Highlights
Now, here’s where things get really interesting. While you’re recording your screen, you can actually add annotations, text, and highlights in real-time. It’s like being your own director!
If you’re using QuickTime Player, simply click on the “Edit” menu in the menu bar at the top of your screen while recording. From there, you’ll see options to add text, shapes, arrows, and even drawings to your recording. Just click and drag to place them wherever you want on the screen.
Third-Party Software Options
But wait, there’s more! If you want even more advanced features for enhancing your recordings, you might want to check out some third-party software options. There are plenty of apps out there that offer additional tools for editing and enhancing your screen recordings.
Some popular options include Camtasia, ScreenFlow, and OBS Studio. These apps allow you to add effects, transitions, and overlays to your recordings, giving them that extra polish.
Practice Makes Perfect
Of course, like anything else, enhancing your screen recordings takes a bit of practice. Don’t worry if your first few recordings don’t turn out exactly how you want them to. The more you experiment with different tools and techniques, the better you’ll get at creating professional-looking recordings.
So go ahead, play around with annotations, text, and other enhancements, and see what works best for you. Before you know it, you’ll be creating screen recordings that look like they were made by a pro!
Now, by knowing how to screen record on mac and with a little bit of creativity and some cool enhancements, you can take your screen recordings to the next level. So go ahead, give it a try, and let your imagination run wild!
How to Screen Record on Mac
Saving and Sharing Your Recording
Alright, you’ve recorded your screen and added some awesome enhancements. Now it’s time to save and share your masterpiece with the world. Let’s get right into it!
Stopping the Recording
Before you can save or share your recording, you need to stop it first. Simply click the stop button in the menu bar at the top of your screen or press Command + Control + Esc on your keyboard. Your recording will automatically be saved on your Mac.
Saving Your Recording
Once your recording is stopped, it’s time to save it to your computer. QuickTime Player will prompt you to choose a location to save your recording. Just select the folder where you want to save it, give it a name, and click “Save.” That’s it, your recording is now safely stored on your Mac.

Sharing Your Recording
Now comes the fun part – sharing your recording with others! There are several ways you can do this:
- Email: You can email your recording as an attachment to friends, family, or colleagues. Just open up your email client, create a new message, and attach the recording file to the email.
- Messaging Apps: If you prefer, you can share your recording through messaging apps like iMessage, WhatsApp, or Slack. Just open the app, create a new message, and attach the recording file.
- Cloud Storage: Another option is to upload your recording to cloud storage services like Google Drive, Dropbox, or iCloud. This way, you can share a link to the recording instead of sending the actual file.
Optimizing Your Recording
Before you hit that send button, it’s a good idea to optimize your recording for sharing. This means making sure the file size isn’t too big and the quality is still good enough for viewing.
If your recording is too large, you can try compressing it using video editing software or online tools. Just be careful not to sacrifice too much quality in the process.
Final Thoughts
And there you have it – you’ve successfully recorded your screen, saved the recording to your Mac, and shared it with others. It’s as easy as that!
Now that you know how to screen record on Mac and share your recordings, the possibilities are endless. Whether you’re creating tutorials, sharing gameplay, or collaborating with colleagues, screen recording is a powerful tool that can help you communicate and connect with others in new and exciting ways.
So go ahead, get out there, and start sharing your screen with the world. Who knows what amazing things you’ll create!
How to Screen Record on Mac
Conclusion
Alright, we’ve covered a lot of ground in this guide on how to screen record on Mac. Let’s wrap things up and summarize what we’ve learned.
The Power of Screen Recording
Screen recording is a super useful tool that lets you capture what’s happening on your computer screen. Whether you’re making tutorials, recording gameplay, or saving important presentations, screen recording can help you share your screen with others in a dynamic and visual way.
Using QuickTime Player
We started by learning how to use QuickTime Player, the built-in screen recording tool on your Mac. With just a few clicks, you can start recording your screen and capture all those important moments.
Enhancing Your Recording
Next, we explored how to enhance your recordings by adding annotations, text, and highlights. These extra touches can make your recordings more engaging and professional-looking.
Saving and Sharing Your Recording
Once your recording is complete, it’s time to save and share it with others. Whether you’re sending it via email, sharing it through messaging apps, or uploading it to cloud storage, there are plenty of ways to get your recording out into the world.
Final Thoughts
Knowing how to Screen record on Mac is a powerful tool that can help you communicate, teach, and share with others in new and exciting ways. Whether you’re a gamer, educator, or business professional, screen recording is a skill worth mastering.
So go ahead, give it a try, and start capturing those screen moments. Who knows what amazing things you’ll create with your newfound screen recording skills!
And remember, if you ever need a refresher, you can always come back to this guide for help. Happy recording!